Resources
tips, tricks & links for marketing pros
Scanning the Right Resolution
In order to optimize the scanning of an image for a particular project it is important to consider a number of different factors such as the final print or output size, the viewing distance and the size of the original image. We present here two formulas that utilize these factors and are designed to help you to calculate the correct scanning resolution.
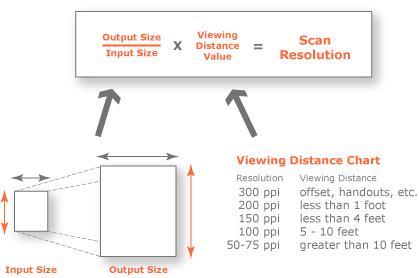
The first formula is the Scan Resolution Formula and it is based on numbers derived from the input size of the original image, the output or final print size and the viewing distance (see below).
The second formula is the Print File Size Formula and it gives you a guideline for creating a scanned file that is large enough for the output size required.
Scan Resolution Formula
Using this formula to compute scanner resolution will allow you to have manageable file sizes while eliminating the dreaded “jaggies” (aliasing) from too low a resolution.

Examples
| 35mm slide enlarged to 20" print, viewed at 1 foot 5"x7" transparency enlarged to 40" print, viewed at 10 feet 8"x10" photo enlarged to 30" print, viewed at 4 feet |
(20"/1.5") x 200 = 2667 dpi (40"/5") x 100 = 800 dpi (30"/8") x 150 = 563 dpi |
After scanning the image, resize the digital scan file using Photoshop (or similar imaging program) to the desired output size and the determined output file resolution (e.g.: 32” x 40” print at 150 ppi).
Saving the Scan
Finally, save your scans properly... CMYK files for offset press, RGB for wide format printing
- CMYK or RGB
- 300 ppi (or other desired resolution)
- EPS (binary) or...
- TIFF (LZW Compression OFF)
